|
|

楼主 |
发表于 2021-2-2 16:04:12
|
显示全部楼层
实验13:地形渲染
这是地形渲染。这项技术可以创建崎bump不平的丘陵景观或物体,就像以前的一些实验室一样,这些山脉也是如此。就像巴布科克博士说的那样,出人意料的是,它的确不是那么有趣……(咳嗽,下一次演讲时咳嗽)。
0.入门下载CS470_Lab13.zip,将其保存到labs目录中。
双击CS470_Lab13.zip并将存档内容提取到名为CS470_Lab13的子目录中
导航到CS470_Lab13目录,然后双击CS470_Lab13.sln。
1. HeightMaps高度图用于说明地形高程的差异。高度图是值的矩阵,每个值代表我们应用程序中顶点网格中顶点的单个高度。
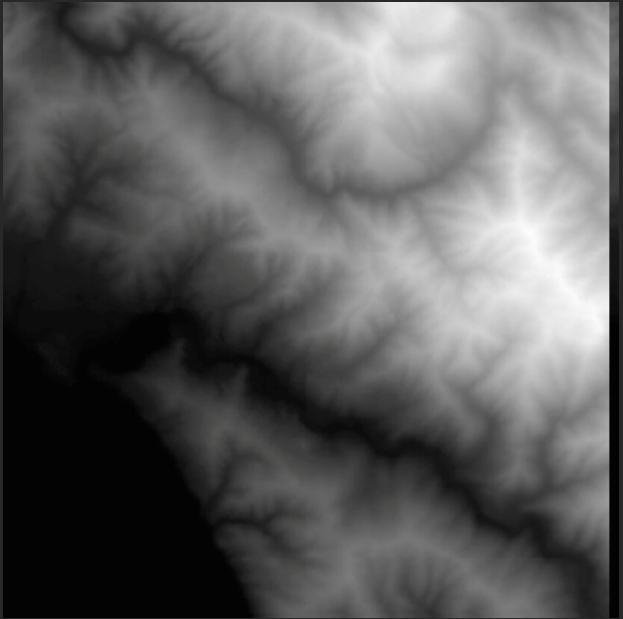
高度图由灰度图像图形表示。黑色(RGB:0,0,0)表示地形图上的最低区域,而白色区域(RGB:1,1,1)表示高程的最高点。灰色表示之间的高度变化。以下是高度图的示例:

在本实验中,我们将使用RAW图像类型,尽管您可以使用任何可用的图像格式。由于易于将RAW数据加载到我们的程序中,因此使用了RAW格式。8位RAW文件可以容纳256个可能的高度范围。如果使用16位RAW文件,则可以表示65536个范围。在本实验中,我们使用8位RAW文件。
生成RAW文件要生成RAW文件,可以使用Adobe Photoshop和Corel PaintShop来简单地绘制高度图。Terragen,Byrce和Dark Tree允许您以程序方式创建高度图。双击“ Mesh.h”,该文件中应该已经有一个骨架结构,并且方法原型已经就位,包括getter / setter方法和一个复制构造函数。
2.加载RAW文件因为RAW文件只不过是一个连续的字节块(每个字节都是一个高度图条目),我们可以通过一个std :: ifstream :: read调用轻松地读取内存块,就像在下一个方法中所做的一样。 :
void Terrain: oadHeightmap() { // A height for each vertex std::vector<unsigned char> in( mInfo.HeightmapWidth * mInfo.HeightmapHeight); // Open the file. std::ifstream inFile; inFile.open(mInfo.HeightMapFilename.c_str(), std::ios_base::binary); if(inFile) { // Read the RAW bytes. inFile.read((char*)&in[0], (std::streamsize)in.size()); // Done with file. inFile.close(); } // Copy the array data into a float array and scale it. mHeightmap.resize(mInfo.HeightmapHeight * mInfo.HeightmapWidth, 0); for(UINT i = 0; i < mInfo.HeightmapHeight * mInfo.HeightmapWidth; ++i) { mHeightmap = (in / 255.0f)*mInfo.HeightScale; }} oadHeightmap() { // A height for each vertex std::vector<unsigned char> in( mInfo.HeightmapWidth * mInfo.HeightmapHeight); // Open the file. std::ifstream inFile; inFile.open(mInfo.HeightMapFilename.c_str(), std::ios_base::binary); if(inFile) { // Read the RAW bytes. inFile.read((char*)&in[0], (std::streamsize)in.size()); // Done with file. inFile.close(); } // Copy the array data into a float array and scale it. mHeightmap.resize(mInfo.HeightmapHeight * mInfo.HeightmapWidth, 0); for(UINT i = 0; i < mInfo.HeightmapHeight * mInfo.HeightmapWidth; ++i) { mHeightmap = (in / 255.0f)*mInfo.HeightScale; }}
mInfo变量是Terrain类的成员,是以下结构的实例,该结构描述了地形的各种属性:
struct InitInfo { // Filename of RAW heightmap data. std::wstring HeightMapFilename; // Texture filenames used for texturing the terrain. std::wstring LayerMapFilename0; std::wstring LayerMapFilename1; std::wstring LayerMapFilename2; std::wstring LayerMapFilename3; std::wstring LayerMapFilename4; std::wstring BlendMapFilename; // Scale to apply to heights after they have been // loaded from the heightmap. float HeightScale; // Dimensions of the heightmap. UINT HeightmapWidth; UINT HeightmapHeight; // The cell spacing along the x- and z-axes float CellSpacing; };
该LayerMapFilename#将举行中使用的各种材质。
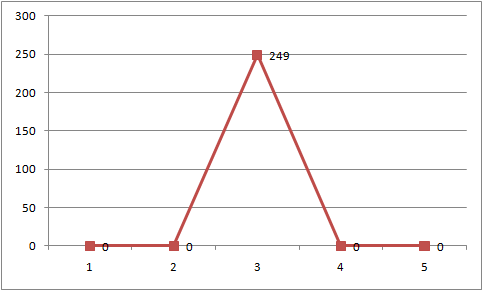
3.平滑由于我们只是将高度值加载到float数组中,因此我们现在可以表示各种高度。但是,由于这些高度是用整数表示的,因此最终可能会导致地形具有我们想要的更陡峭的峰谷。
我们得到这个:

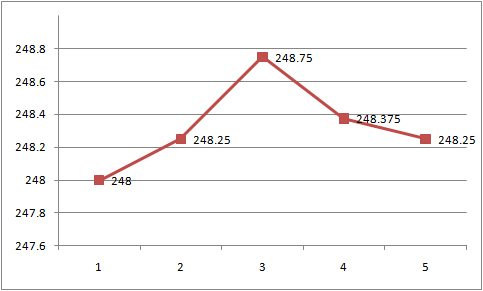
当我们想要更接近此的东西时:

为了解决这个问题,我们需要平滑值。只需通过获取周围的8个像素的平均值,即可对高度图像素进行平滑处理。这是对高度图中第ij个像素取平均值的函数的实现:
bool Terrain::InBounds(int i, int j) { // True if ij are valid indices; false otherwise. return i >= 0 && i < (int)mInfo.HeightmapHeight && j >= 0 && j < (int)mInfo.HeightmapWidth; } float Terrain::Average(int i, int j) { // Function computes the average height of the ij element. // It averages itself with its eight neighbor pixels. Note // that if a pixel is missing neighbor, we just don't include it // in the average--that is, edge pixels don't have a neighbor pixel. // ---------- // | 1| 2| 3| // ---------- // |4 |ij| 6| // ---------- // | 7| 8| 9| // ---------- float avg = 0.0f; float num = 0.0f; // Use int to allow negatives. If we use UINT, @ i=0, m=i-1=UINT_MAX // and no iterations of the outer for loop occur. for(int m = i-1; m <= i+1; ++m) { for(int n = j-1; n <= j+1; ++n) { if(InBounds(m,n)) { avg += mHeightmap[m*mInfo.HeightmapWidth + n]; num += 1.0f; } } } return avg / num;}
如果条目位于高度图上,则函数inBounds返回true,否则返回false。因此,如果我们尝试在不属于高度图一部分的边缘上的某个条目附近采样一个元素,则inBounds返回false,并且我们不将其包括在平均值中-它不存在。
4.地形顶点着色器我们的顶点着色器几乎是一个简单的直通着色器,除了我们通过读取heightmap值对贴片控制点进行位移映射。这会将控制点的y坐标放置在适当的高度。
Texture2D gHeightMap; SamplerState samHeightmap { Filter = MIN_MAG_LINEAR_MIP_POINT; AddressU = CLAMP; AddressV = CLAMP; }; struct VertexIn { float3 PosL : POSITION; float2 Tex : TEXCOORD0; float2 BoundsY : TEXCOORD1; }; struct VertexOut { float3 PosW : POSITION; float2 Tex : TEXCOORD0; float2 BoundsY : TEXCOORD1; }; VertexOut VS(VertexIn vin) { VertexOut vout; // Terrain specified directly in world space. vout.PosW = vin.PosL; // Displace the patch corners to world space. This is to make // the eye to patch distance calculation more accurate. vout.PosW.y = gHeightMap.SampleLevel(samHeightmap, vin.Tex, 0).r; // Output vertex attributes to next stage. vout.Tex = vin.Tex; vout.BoundsY = vin.BoundsY; return vout;}
5.位移映射为每个生成的顶点评估域着色器。我们在域着色器中的任务是使用细分的顶点位置的参数(u,v)坐标对控制点数据进行插值,以得出实际的顶点位置和纹理坐标。另外,我们对高度图进行采样以执行位移映射。
struct DomainOut { float4 PosH : SV_POSITION; float3 PosW : POSITION; float2 Tex : TEXCOORD0; float2 TiledTex : TEXCOORD1; }; // How much to tile the texture layers. float2 gTexScale = 50.0f; [domain("quad")] DomainOut DS(PatchTess patchTess, float2 uv : SV_DomainLocation, const OutputPatch<HullOut, 4> quad) { DomainOut dout; // Bilinear interpolation. dout.PosW = lerp( lerp(quad[0].PosW, quad[1].PosW, uv.x), lerp(quad[2].PosW, quad[3].PosW, uv.x), uv.y ); dout.Tex = lerp( lerp(quad[0].Tex, quad[1].Tex, uv.x), lerp(quad[2].Tex, quad[3].Tex, uv.x), uv.y ); // Tile layer textures over terrain. dout.TiledTex = dout.Tex*gTexScale; // Displacement mapping dout.PosW.y = gHeightMap.SampleLevel(samHeightmap, dout.Tex, 0).r; // NOTE: We tried computing the normal in the domain shader // using finite difference, but the vertices move continuously // with fractional_even which creates noticable light shimmering // artifacts as the normal changes. Therefore, we moved the // calculation to the pixel shader. // Project to homogeneous clip space. dout.PosH = mul(float4(dout.PosW, 1.0f), gViewProj); return dout;}
6.地形纹理我们想同时创建描绘沙,草,尘土,岩石和雪的地形。您可能会建议创建一个包含沙子,草,灰尘等的大型纹理,然后将其拉伸到整个地形上。但是,这将导致我们回到分辨率问题上-地形几何是如此之大,我们将需要一个不切实际的大纹理,以具有足够的颜色样本来获得合适的分辨率。取而代之的是,我们采用一种多纹理化方法,其工作方式类似于透明度alpha混合。
以下地形像素着色器代码显示了如何实现纹理混合:
// Sample layers in texture array. float4 c0 = gLayerMapArray.Sample(samLinear, float3(pin.TiledTex, 0.0f)); float4 c1 = gLayerMapArray.Sample(samLinear, float3(pin.TiledTex, 1.0f)); float4 c2 = gLayerMapArray.Sample(samLinear, float3(pin.TiledTex, 2.0f)); float4 c3 = gLayerMapArray.Sample(samLinear, float3(pin.TiledTex, 3.0f)); float4 c4 = gLayerMapArray.Sample(samLinear, float3(pin.TiledTex, 4.0f));// Sample the blend map. float4 t = gBlendMap.Sample(samLinear, pin.Tex); // Blend the layers on top of each other. float4 texColor = c0; texColor = lerp(texColor, c1, t.r); texColor = lerp(texColor, c2, t.g); texColor = lerp(texColor, c3, t.b); texColor = lerp(texColor, c4, t.a);
7.地形高度(数学y)一个常见的任务是在给定x和z坐标的情况下获取地形表面的高度。这对于将对象放置在地形表面上或将摄像机稍微放在地形表面上以模拟玩家在地形上行走非常有用。高度图为我们提供了网格点处的地形顶点的高度。但是,我们需要顶点之间的地形高度。因此,我们必须进行插值以形成一个连续的表面y = h(x,z),该表面表示给定离散高度图采样的地形。由于地形是由三角形网格近似的,因此使用线性插值是有意义的,以便我们的高度函数与基础地形网格的几何形状一致。
为了解决这个问题,我们的首要目标是弄清楚x坐标和z坐标位于哪个单元格中。(注意:我们假设x和z坐标相对于地形的局部空间。)以下代码可以这个:
// Transform from terrain local space to "cell" space. float c = (x + 0.5f*width()) / mInfo.CellSpacing; float d = (z - 0.5f*depth()) / -mInfo.CellSpacing; // Get the row and column we are in. int row = (int)floorf(d); int col = (int)floorf(c);
现在我们知道了我们所在的单元格,我们从高度图中获取四个单元格顶点的高度:
// Grab the heights of the cell we are in. // A*--*B // | /| // |/ | // C*--*D float A = mHeightmap[row*mInfo.HeightmapWidth + col];float B = mHeightmap[row*mInfo.HeightmapWidth + col + 1]; float C = mHeightmap[(row+1)*mInfo.HeightmapWidth + col]; float D = mHeightmap[(row+1)*mInfo.HeightmapWidth + col + 1];
至此,我们知道了我们所在的单元格,并且知道了该单元格四个顶点的高度。现在我们需要在特定的x和z坐标处找到地形表面的高度(y坐标)。这有点棘手,因为该单元可以在几个方向上倾斜。
为了找到高度,我们需要知道单元格所在的三角形(记得我们的单元格渲染为两个三角形)。为了找到我们所处的三角形,我们将更改坐标,以便相对于像元坐标系描述坐标(c,d)。这种简单的坐标更改仅涉及平移,操作如下:
float s = c - (float)col; float t = d - (float)row;
然后,如果s + t = 1,我们在上三角形ABC中,否则我们在下三角形DCB中。现在我们解释如果我们在上三角形中,如何找到高度。下三角形的过程与此类似,当然,后面两个代码都将很快出现。为了找到高度(如果我们在上三角形中),我们首先在三角形的边上构造两个向量u =(x,B-A,0)和v =(0,C-A,-z)终端点Q。
Q + su + tv点的y坐标基于给定的x和z坐标给出高度。
因此,Terrain :: GetHeight()代码的结论是:
// If upper triangle ABC. if(s + t <= 1.0f) { float uy = B - A; float vy = C - A; return A + s*uy + t*vy; } else // lower triangle DCB. { float uy = C - D; float vy = B - D; return D + (1.0f-s)*uy + (1.0f-t)*vy; }
现在,我们可以将摄像机固定在地形上方,以模拟玩家正在地形上行走:
void TerrainApp::UpdateScene(float dt) { // // Control the camera. // if(GetAsyncKeyState('W') & 0x8000) mCam.Walk(10.0f*dt); if(GetAsyncKeyState('S') & 0x8000) mCam.Walk(-10.0f*dt); if(GetAsyncKeyState('A') & 0x8000) mCam.Strafe(-10.0f*dt); if(GetAsyncKeyState('D') & 0x8000) mCam.Strafe(10.0f*dt); // // Walk/fly mode // if(GetAsyncKeyState('2') & 0x8000) mWalkCamMode = true; if(GetAsyncKeyState('3') & 0x8000) mWalkCamMode = false; // // Clamp camera to terrain surface in walk mode. // if(mWalkCamMode) { XMFLOAT3 camPos = mCam.GetPosition(); float y = mTerrain.GetHeight(camPos.x, camPos.z); mCam.SetPosition(camPos.x, y + 2.0f, camPos.z); } mCam.UpdateViewMatrix();}
8.编译并运行程序输入完代码后,您可以通过以下两种方式之一来构建和运行程序:
- 点击顶部工具栏中间的绿色小箭头
- 点击F5(或Ctrl-F5)
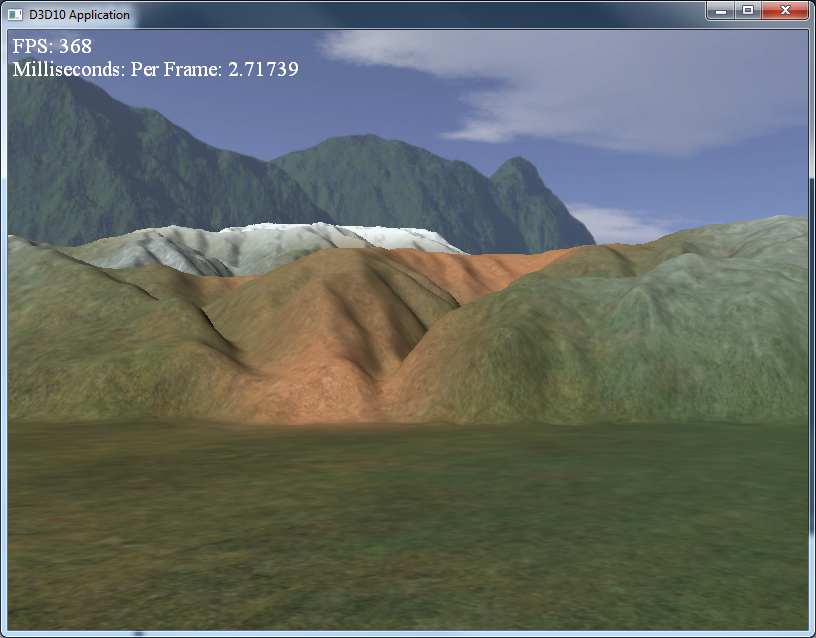
输出应类似于以下内容

要退出程序,只需关闭窗口即可。
|
|